General Planting Instructions
7 Easy Steps to Ensure a Healthier Plant!
For your plants to thrive and have the greatest chance of survival, it is important to take the time to properly prepare the soil in the area where you will be planting. Below are some simple steps to ensure your plants get off to a good start.
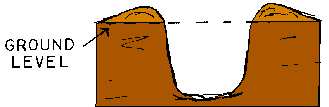
Step 1
Dig a hole at least twice as wide as
the container and approximately 1 1/2 to 2 times the depth of the container.
This is especially important if your ground consists of heavy clay
soil.
Step 2
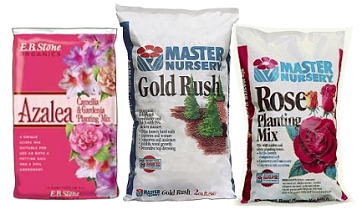
Fill the hole with 1 to 2 shovels of
compost to every 2 shovels of soil from the hole until the hole is just over
half full. For heavy clay soils, we recommend a 50 percent compost and 50
percent original soil mix. For most plants, we recommend using the Master
Nursery Gold Rush. This consists of high quality Fir mulch and 15 percent
Chicken Manure. For acid loving plants, like Azaleas, Camellias, Rhododendrons,
and Gardenias, we recommend the EB Stone Azalea, Camellia, and Rhododendron
Mix. This mix is specially formulated for acid loving plants. And for
roses, we recommend the EB Stone Rose Planting
Mix.
Step 3
Now is the time to add Master Start (5-20-10 with iron, calcium, zinc, and manganese) or E.B. Stone Sure Start to the hole. Simply turn it into the newly mixed soil. This will ensure the plant will have the nutrients it needs for optimum growth. Important: Follow the instructions for the right amount to apply when planting.
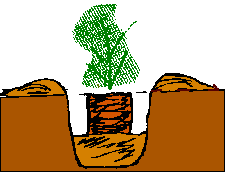
Step 4
Carefully remove the plant from the container. If necessary, cut the can. Place the plant in the center of the hole. The top of the root ball should be about level with the ground or slightly raised. Important: For trees or plants that are grafted, the graft should be above the ground.
Step 5
Continue filling the hole with the soil and compost mix until the roots are covered and the hole is completely filled. Lightly tamp the soil down to help get rid of large air pockets.
Step 6
Water well immediately after planting and again the following day.
Step 7
Continue to water on a regular basis. For many plants one good watering once or twice a week is sufficient. Some plants may require additional watering. Also, when planting during warm or hot weather, plants will need to be watered several times during the first couple of weeks to keep the roots from drying out. Groundcovers will usually require daily watering the first week or two when first planted if the temperature is hot. Keep an eye on the newly planted plants. They will tell you if they are not getting enough water.